Translate
June 25, 2022
6/25/2022 11:37:00 PM
Lets make a background tile. This is going to have a cool pixelated design to it.
You can use it for a signature tag, Incredimail Letter, website design, table border... Whatever you choose.
Graphic Credits: MD, AlskasAbode IOP [closed]
-------------------
Okay, lets grab all your filters/plugins first. You'll need to re-start your graphics program for them to appear most likely.
Eye Candy 5-Alien Skin Textures :: Xero>>(Fritilary) :: VM Toolbox (softborder)
Simple (quick tile) ::
Note: How pretty this turns out really depends on the colors of graphics you use.
You are welcome to use my scene, or create your own.

If your using my template - just open it in graphics program. (This is written with paintshop pro 12 settings)
• Adjust >>> Gaussian Blur x5.00
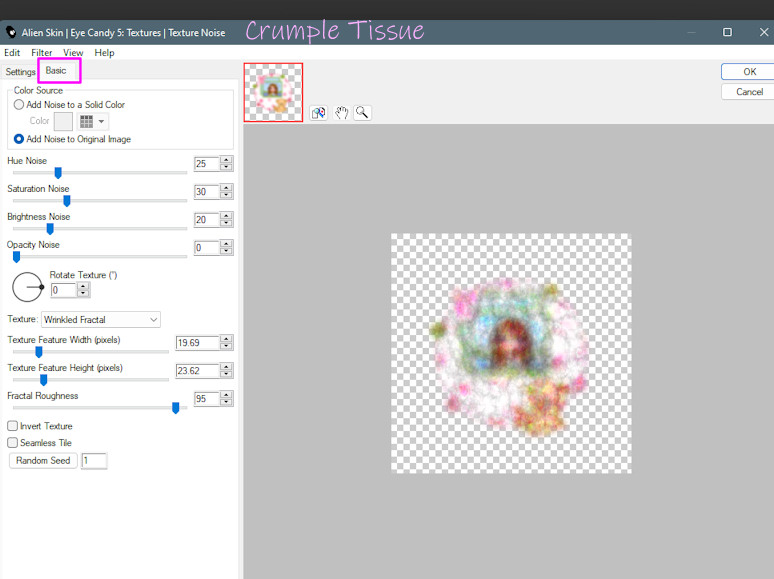
• Effects >> AlienSkin Texture5/Texture Noise. In 'settings' choose 'crumpled tissue'
Basic Tab:
• Layers/ Add Raster Layer. Drag to bottom layer. [you may need to hide/deactivate your graphic layer to flood fill...]
• Flood Fill with color of your choice. I used #ffa1bc (pink)
• Now at this point I will sometimes make copies of the image and move
them around to make a larger decorated tile.
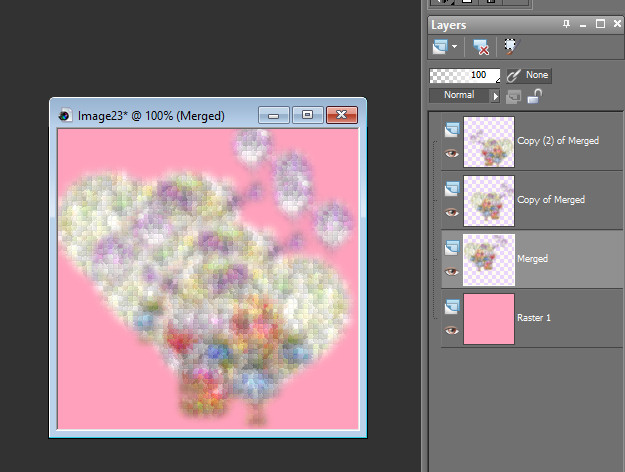
• Layers/Merge Visible
• Effects >>> VM Toolbox > Soft Borders
Settings: Transition-100, R,G,B - 255, Padding-4
• Effects >> Simple > Quick Tile.
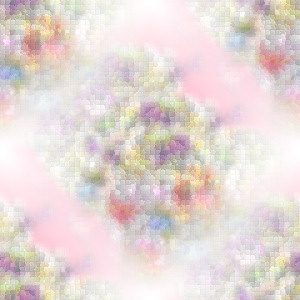
And your done! Once you have these steps memorized this is a very fast background to create.
This is what mine looks like
You are welcome to use my scene, or create your own.

If your using my template - just open it in graphics program. (This is written with paintshop pro 12 settings)
• Adjust >>> Gaussian Blur x5.00
• Effects >> AlienSkin Texture5/Texture Noise. In 'settings' choose 'crumpled tissue'
Basic Tab:

• Layers/ Add Raster Layer. Drag to bottom layer. [you may need to hide/deactivate your graphic layer to flood fill...]
• Flood Fill with color of your choice. I used #ffa1bc (pink)

• Now at this point I will sometimes make copies of the image and move
them around to make a larger decorated tile.

• Layers/Merge Visible
• Effects >>> VM Toolbox > Soft Borders
Settings: Transition-100, R,G,B - 255, Padding-4
• Effects >> Simple > Quick Tile.
And your done!
 Once you have these steps memorized this is a very fast background to create.
 This is what mine looks like
If you want less background and more of the pixelated design. Just move your images around more to take up the whole space of the background...
I think I actually like this one better.
I used 6 copies of my graphic on this one, and moved them about.
Tutorial written by Julie S. Jenks February 2022
Any likeness to another tutorial is purely by coincidence.
I used 6 copies of my graphic on this one, and moved them about.
Tutorial written by Julie S. Jenks February 2022
Any likeness to another tutorial is purely by coincidence.
Labels:Background Tile,Pixels,Tutorials
Subscribe to:
Post Comments
(Atom)
Labels
*Freebie*
#ATG
#autumn
#christmas
#Contest
#CTwork
#DrawYourDreams
#faeriecharmdesigns
#forumchallenges
#fun
#MVD
#PGD
#RenderArtWorld
#SecretGardenDesigns
#TSC
#winter
#YKS
©Alex Prihodko
©Amber
©BellaCaribena
©Goldwasser
©Grianna
©IsmaelRac #SavageDezines
©Sheokate
©Steampunk
©VeryMany Tubes
©VeryManyArtists
©VMartists
3tzsdesigns
AdriennesDesigns
Adrun
AdRunner
Advent Calendar
AI
AMD
Aprilthescrapaholic
ATG
ATS
Autumn
AWS
Background Tile
BCA
beautiful
BJD
BMS
CAK
Chit-Chat
Christmas
Christmas in July
CnC
Coffee
Commission
Creative Misfits
CT
CTshowcase
CU
Cute-n-CharmingForum
Daily Stuff
dark
DeedlesnDoodles
DeniseC Art
DesignsbyKetura
DesignzByAnorie
diet
Digicats
DreamingWithBella
EFR
EleganceFly
FaerieCharmDesigns
Fall
family
fonts
forum exclusives
forumlife
freebies
friends
fun
gothic
gothique
Halloween
health
heart surgery
Hello
Hold My Heart
humans!
In Store
Intro
life
LindseyStirling
LusciousLadee
LynxTheMinx
Magical Moments
MagicalMoments
mental health
Mermaid
Millies PSP Madness
Mizteeques
MMF
mom
MoonVixenDesigns
MVD
my journey
new theme
news
October
Photoshop
Pixels
Prozac
PU
rant
RAOK
Re-Post
review
S&CO
sadness sickness
Savage Dezines
Scrapkits
SD
SecretGardenDesigns
Shares
siggie showcase
Siggies
Sigtags
Siren
snags
SneakPeek
steampunk
store-reviews
sugar
Suicide
summer
TagShowcase
ThePaperShelter
Tiny Turtle Designs
TKdezigns
tut-results
Tutorials
Tutorials by Pammers
updates
valentine bash
violin
WickedDiablaDesigns
winter
witch
work
Yule





0 comments:
Post a Comment
Leave me some luv and glitter! xoxo