My Logos

Stores I sell at





I'm Admiring:


I'm A Fan Of


Showing posts with label Tutorials. Show all posts
Showing posts with label Tutorials. Show all posts
June 25, 2022
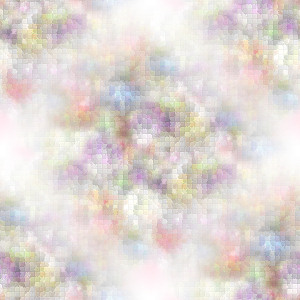
Lets make a background tile. This is going to have a cool pixelated design to it.
You can use it for a signature tag, Incredimail Letter, website design, table border... Whatever you choose.
Graphic Credits: MD, AlskasAbode IOP [closed]
-------------------
Okay, lets grab all your filters/plugins first. You'll need to re-start your graphics program for them to appear most likely.
Eye Candy 5-Alien Skin Textures :: Xero>>(Fritilary) :: VM Toolbox (softborder)
Simple (quick tile) ::
You can use it for a signature tag, Incredimail Letter, website design, table border... Whatever you choose.
Graphic Credits: MD, AlskasAbode IOP [closed]
-------------------
Okay, lets grab all your filters/plugins first. You'll need to re-start your graphics program for them to appear most likely.
Eye Candy 5-Alien Skin Textures :: Xero>>(Fritilary) :: VM Toolbox (softborder)
Simple (quick tile) ::
Note: How pretty this turns out really depends on the colors of graphics you use.
You are welcome to use my scene, or create your own.
If your using my template - just open it in graphics program. (This is written with paintshop pro 12 settings)
• Adjust >>> Gaussian Blur x5.00
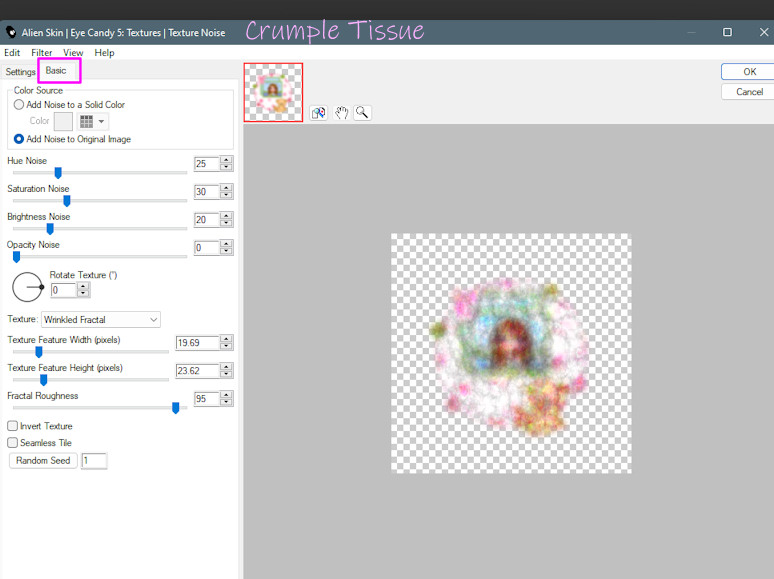
• Effects >> AlienSkin Texture5/Texture Noise. In 'settings' choose 'crumpled tissue'
Basic Tab:
• Layers/ Add Raster Layer. Drag to bottom layer. [you may need to hide/deactivate your graphic layer to flood fill...]
• Flood Fill with color of your choice. I used #ffa1bc (pink)
• Now at this point I will sometimes make copies of the image and move
them around to make a larger decorated tile.
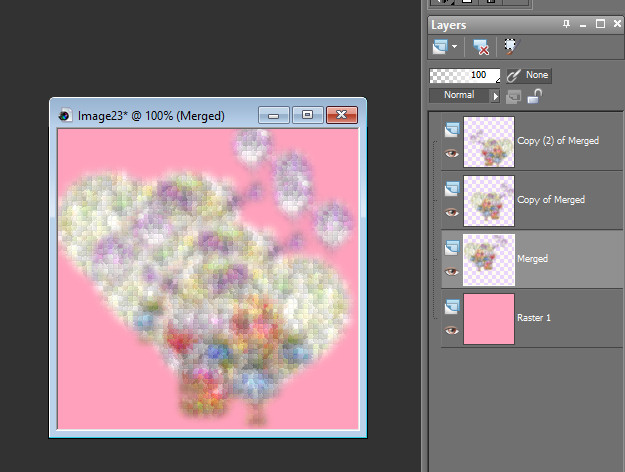
• Layers/Merge Visible
• Effects >>> VM Toolbox > Soft Borders
Settings: Transition-100, R,G,B - 255, Padding-4
• Effects >> Simple > Quick Tile.
And your done! Once you have these steps memorized this is a very fast background to create.
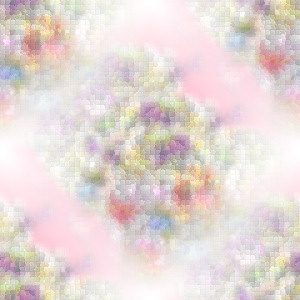
This is what mine looks like
You are welcome to use my scene, or create your own.
If your using my template - just open it in graphics program. (This is written with paintshop pro 12 settings)
• Adjust >>> Gaussian Blur x5.00
• Effects >> AlienSkin Texture5/Texture Noise. In 'settings' choose 'crumpled tissue'
Basic Tab:
• Layers/ Add Raster Layer. Drag to bottom layer. [you may need to hide/deactivate your graphic layer to flood fill...]
• Flood Fill with color of your choice. I used #ffa1bc (pink)
• Now at this point I will sometimes make copies of the image and move
them around to make a larger decorated tile.
• Layers/Merge Visible
• Effects >>> VM Toolbox > Soft Borders
Settings: Transition-100, R,G,B - 255, Padding-4
• Effects >> Simple > Quick Tile.
And your done!
Once you have these steps memorized this is a very fast background to create. This is what mine looks like
If you want less background and more of the pixelated design. Just move your images around more to take up the whole space of the background...
I think I actually like this one better.
I used 6 copies of my graphic on this one, and moved them about.
Tutorial written by Julie S. Jenks February 2022
Any likeness to another tutorial is purely by coincidence.
I used 6 copies of my graphic on this one, and moved them about.
Tutorial written by Julie S. Jenks February 2022
Any likeness to another tutorial is purely by coincidence.


Tube: ©Alex Prihodko Get it at: VMA
Download - Cluster Frame (#23) Blue Shores FTU Scrap Kit Christmas at the Beach freebie Mehdi Plugins
- Resizing of images will be done with 'bicubic' setting.
Open Cluster Frame, resize 80% copy/paste into new blank canvas 800x800px
Open Blue Shores Element 3. Resize 30% paste into image, move to lower right of the smaller frame on the right side.
Open Paper 6 - paste as new layer into your design. In your layers palette, drag it to the bottom.
Move around until you have a nice setting in your frames. Erase all the extra that is not the background
in the frames.
Open element 31. resize 65% paste as new layer into the larger frame. Should be just above the scenery layer.
Open the christmas at the beach kit - numbers 56 and 54 resize 54 to 30% place at bottom of frames and flowers on the right
resize 54 to 20% place on left with the curve of the shell just on top of the blue flower.
open image 80, resize 25% paste into your image, just behind the clam shell on the right.
Open image 9 - resize 15% paste on top of the clam shell layer, just to the left. free rotate to the right 15 degrees.
Adjust >> Sharpness >> Sharpen
Back to the Mizteeques Blue Shores Kit now --
Open element 1 - beautiful flower!! resize 30% / Adjust >> sharpness >> sharpen
paste on to the upper left corner of large frame.
Effects >> 3Deffects >> drop shadow: 3,3,50,6
Effects >> 3Deffects >> drop shadow: -3, -3, 50, 6
Open element 6, resize 30%, paste onto the upper right corner of large frame, just above the other flowers.
Open element 17, resize 12% place on top left of small frame
Open element 11, resize 10%, place in sky in larger frame.
Paste in your main tube - mermaid or whatever you are using.
I am using :copyright:Alex Prihodko mermaid purchased at VeryMany Artists just $1.85!!!
Then on your layers palette, drag your tube layer below the frames, but on top of the beach background.
I have mine peeking from behind the seaweed. Resize your tube to whatever you need to, to look nice.
Erase the extra parts again.
Effects >> 3D effects >> drop shadow : same settings -3, -3, 10, 6
Still on that layer, change the Blend Mode to Luminance (Legacy)
Lower the opacity to 53%
Paste your main tube again as new layer. Move it to the very top layer on the layer palette or
layers >> arrange >> bring to top
Depending on the size of your tube and what it is - resize.
I resized mine 45%. To make room for my tube; I hide that layer. Merge all visible for the rest of the items.
Image >> resize canvas >> 1000 x 1000 px -- so I have room to move things around...
Effects >> 3D effects >> drop shadow: -6, -9, 57, 6
layers merge visible
Lets go back to our Christmas at the Beach 1 more time 
Open item 12. Paste as new layer. These bubbles are so pretty. I resized 40% and left them directly on my mermaid.
This is totally optional. duplicate bubble layer, resize 60% move to the small frame and arrange above the bottle.
Layers >>> merge visible
If you want your finished image smaller than it is. This is the time to do that. -- Before we create the back drop and put on the credits and our license number.
Duplicate your layer. Hide top layer. click bottom layer on layer palette so your working with only that layer.
Effects >> Medhi >> Melt
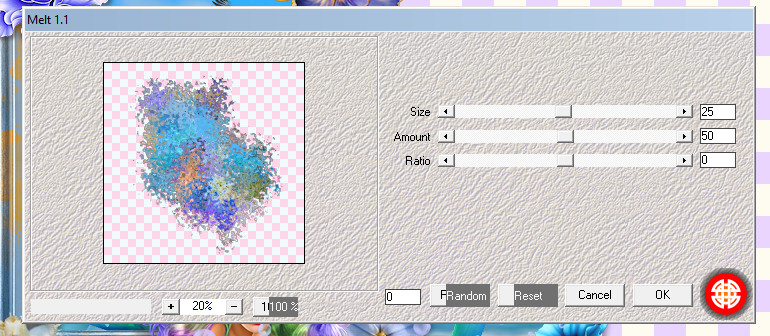
Unhide top layer. Merge / Visible.
Add credits.
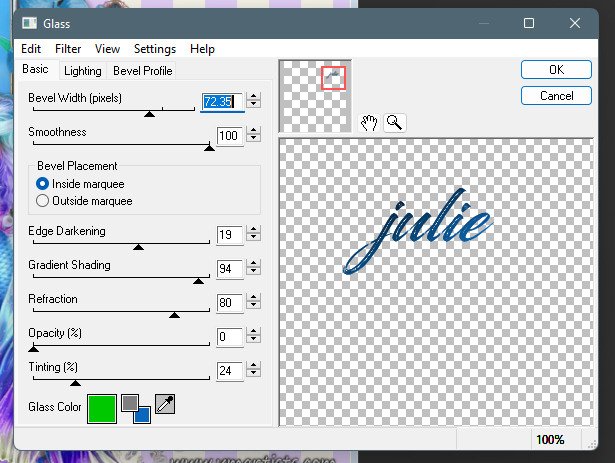
Add name. I didn't list Eye Candy in the filters. I just decided to use it on my name at the last minute...
And DOnE!
Tutorial by Julie S. Jenks June 17, 2022
Hi everyone!! I'm so excited about this tutorial. It is of my own making. Dreamed up on June 18, 2022
It is FTU - (created with free to use items) When I use PTU(pay to use) items, you do not have to purchase those items. You are completely welcome to use substitutes. What you create from a tutorial is yours. Within the limits of Terms of Usage for the sites you obtain the tubes and kits from...
Always credit the tube artist with your license number and however they want it on your creation.
• Copyright Symbol •URL of website •Your License number given to you by the website/company/artist...
The tube I am using is PTU at VeryMany These tubes really are very low cost. Understandable that not everyone can afford to do this. So your welcome to use tube of your choice.
Download FTU Scrapkit Bee To The Blossom :: Download Mask 7 from MPM ::Xero/Fritillary Filter :: MuRa Filter (copies)
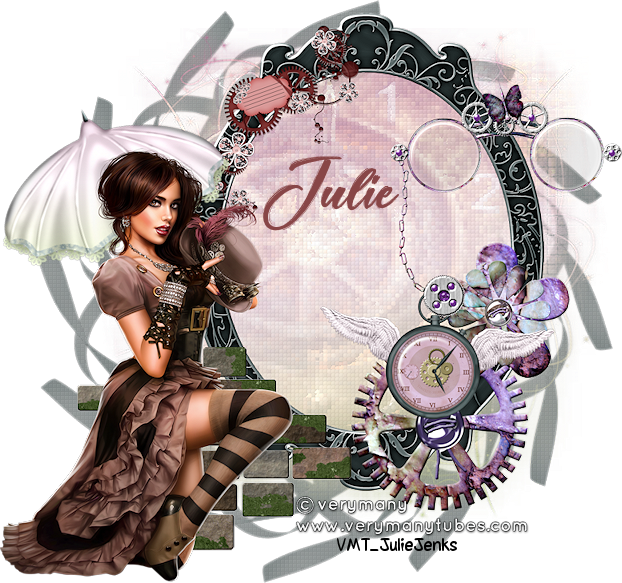
Open 800x800 (can resize later) blank canvas.
Open BTB paper 06 / copy and paste into your blank canvas.
resize 80%/ resize all layers unchecked /
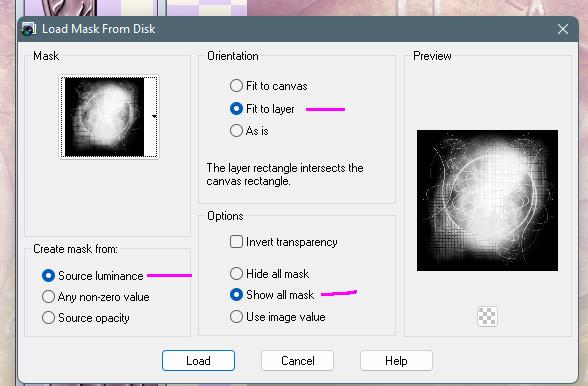
On the mask layer - merge - group
duplicate layer twice
layers / merge visible
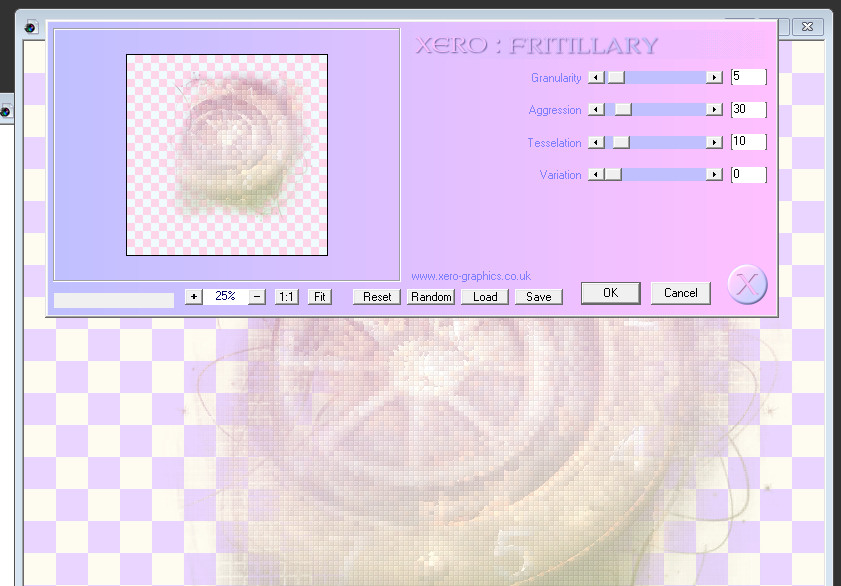
Effects / Xero / Fritillary
This is one of my fave filters. I use it a lot!
Lets go to the elements of the scrap kit Bee to the Blossom
Open 'rock wall' paste as new layer/ resize that layer to 60%.
Make sure 'resize all layers' is off from now on.
Open frame 02 paste as new layer / move to the right so you can see the numbers
of the background/mask. Drag to 2nd to last layer (just above the mask background)
copy/paste element 'gear 01' as top layer (on top of the frame)
resize 50%, move to lower right corner of frame.
Paste flower 01 above the gear on the right. resize 40%
Open the parasol. Paste as new layer. resize 40%, free rotate left 20 degrees. Place on left side of the frame.
Open pocketwatch, paste as new layer, resize 65%, place on top of the 2 elements on the lower right.
Open goggles, paste as new layer, resize 60%, place on upper right of frame where you think it looks nice.
Paste ribbon 01 as new layer. Resize 75%
Effects /MuRa's Meister >> copies >> encircle (located on the bottom menu)
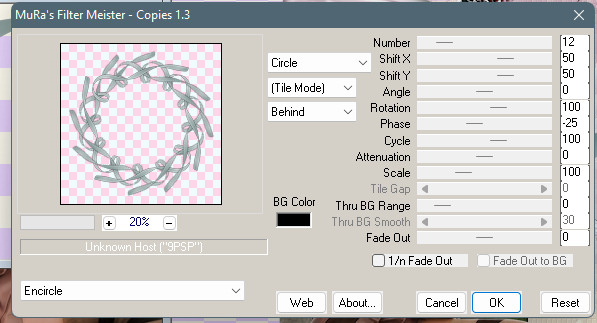
Drag to very bottom layer
on layer palette menu change to 'soft light'
effects / xero >> fritillary
paste your tube on top layer, with the rock wall behind. Move the parasol around to position
it in a good place.
Layers merge visible. Resize now if you like. Then adjust/sharpness/sharpen.
Then put on your credit / license...
Add your name if your creating a sigtag.
layers/merge visible / paste as new images
Save as .png to have a transparent background...
Font - Daughter of Fortune
https://www.dafont.com/daughter-of-fortune.font
Subscribe to:
Posts
(Atom)
Enchanted Scraps CT Squad


